How to Configure Browsers for Kerberos Authentication
The browser configurations below are required only for those browsers used to connect to Cloudera Manager instances with the Require Authentication for HTTP Web Consoles configuration property enabled. The settings below enable the respective browser to use SPNEGO to negotiate Kerberos authentication for the browser. The host running the browser must have a valid TGT to authenticate to Kerberos Web Consoles.
Continue reading:
Mozilla Firefox
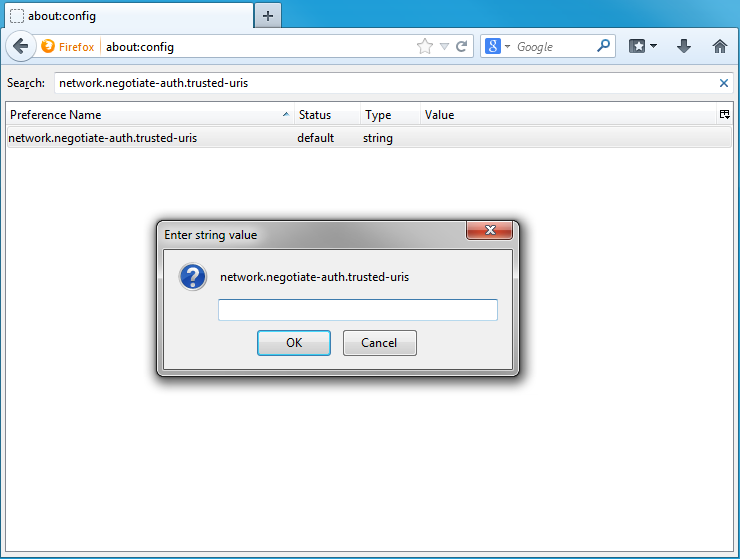
- Open the low level Firefox configuration page by loading the about:config page.
- In the Search text box, enter: network.negotiate-auth.trusted-uris
- Double-click the network.negotiate-auth.trusted-uris preference and enter the hostname or the domain of the web server that is protected by Kerberos HTTP SPNEGO. Separate multiple domains and hostnames with a comma.
- Click OK.

Internet Explorer
Follow the steps below to configure Internet Explorer.
Configuring the Local Intranet Domain
- Open Internet Explorer and click the Settings gear icon in the top-right corner. Select Internet options.
- Select the Security tab.
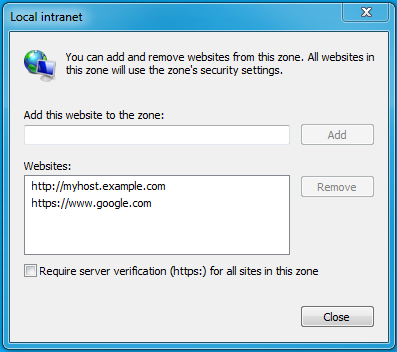
- Select the Local Intranet zone and click the Sites button.
- Make sure that the first two options, Include all local (intranet) sites not listed in other zones and Include all sites that bypass the proxy server are checked.
- Click Advanced and add the names of the domains that are protected by Kerberos HTTP SPNEGO, one at a time, to the list of websites. For example, myhost.example.com. Click Close.
- Click OK to save your configuration changes.

Configuring Intranet Authentication
- Click the Settings gear icon in the top-right corner. Select Internet options.
- Select the Security tab.
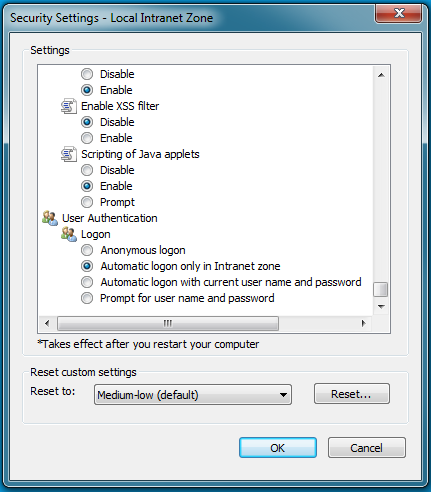
- Select the Local Intranet zone and click the Custom level... button to open the Security Settings - Local Intranet Zone dialog box.
- Scroll down to the User Authentication options and select Automatic logon only in Intranet zone.
- Click OK to save these changes.

Verifying Proxy Settings
Perform these steps only if you have a proxy server already enabled.
- Click the Settings gear icon in the top-right corner. Select Internet options.
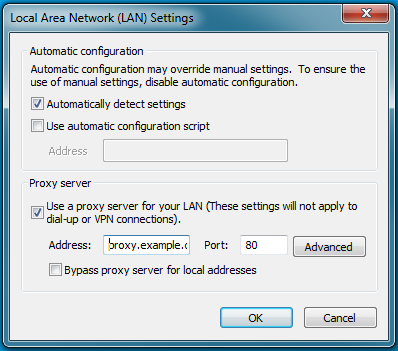
- Select the Connections tab and click LAN Settings.
- Verify that the proxy server Address and Port number settings are correct.
- Click Advanced to open the Proxy Settings dialog box.
- Add the Kerberos-protected domains to the Exceptions field.
- Click OK to save any changes.

Google Chrome
For Windows:
- Open the Control Panel to access the Internet Options dialog. Use the same configuration as detailed in Configuration changes required are the same as those described above for Internet Explorer.
For Linux or MacOS:
- Add the --auth-server-whitelist parameter to the google-chrome command. For example, to run Chrome from a Linux prompt,
run the google-chrome command as follows:
> google-chrome --auth-server-whitelist = "hostname/domain"
Page generated July 25, 2018.
| << How to Configure Browser-based Interfaces to Require Kerberos Authentication | ©2016 Cloudera, Inc. All rights reserved | How to Configure Clusters to Use Kerberos for Authentication >> |
| Terms and Conditions Privacy Policy |